Helium is a decentralized wireless network that uses low power LoRaWAN hotspot devices to transmit and receive data to and from the internet. Hotspot owers “miners” provide covereage for the Helium network. In order mine Helium a LoRaWAN hotspot transmitter such as the Rak V2 or Bobcat 300 is required. These devices can reach 200 times farther than a conventional Wi-Fi hotspot.
In return for building the Helium network miners are rewarded with Helium tokens (HNT). These tokens are automatically distributed to the wallet associated with the hotspot device. Miners earn greater amounts of HNT tokens if they transmit and receive data with more Helium hotspots. As a result hotspot placement and antenna strength are key factors in earning HNT tokens.
LoRa technical information
The Helium network uses LoRa technology. LoRa stands for Long Range Radio and is primarily targeted for IoT networks. This low power long range protoc0l operates in license free radio bands. LoRa differs from 5G, Wi-Fi and Bluetooth because it is used for small data transmissions (bytes of data). Standardized functions, components and Semtech chipsets make up a standard LoRaWan network.
LoRa signals can reach a significant distance which results in less infrastructure required to build a network. In addition, hotspots (a.k.a gateways) can transmit messages for thousands of sensors. As a result an entire city only needs a few hundred hotspots to supply coverage. This makes constructing a network cheap and fast to implement.
Technical architecture of a LoRa network
Who uses the Helium network
The Helium network is an inexpensive option to connect IoT devices that need to transmit small amounts of data over long distances. LoRaWan signals can travel for miles where Wi-Fi would be inaccessible and cellular data would be too expensive.
Different types of LoRa IoT devices can use the Helium network. There are several companies that have built their own LoRaWAN devices (for example Bosch, Abeeway and Adeunis). In addition one can create their own custom device with a Raspberry Pi and Adafruit board or Ardiuno board.
For example one can use the network for tracking pets, bike routes, temperature, weight, water levels, soil sensors, parking meters, air-quality, smart kitchen appliances, cars, etc. Additionally, for more ideas members of the Helium community built the sample projects listed below.
- Long Hive
- Smart Farm
- Urban Water Quality Monitor
- LoRa Weather Buoy
- GPS Tracking
- People Counting
- Solar Monitoring Board with Relays
The network has potential and the possibilities are broad.
Who are Helium’s competitors
The Helium network is in competition with The Things Network. The purpose of both networks is to transmit sensor information to the network for consuming applications. They use the same technology but the major difference between the two networks is the incentive model.
| # | The Things Network (TTN) | Helium Network |
|---|---|---|
| 1 | Hotspot/Gateways are built by community members with no financial interests | Hotspot/Gateways are purchased by community members |
| 2 | Hotspot/Gateways are made with Semtech’s chipset | Hotspot/Gateways are made with Semtech’s chipset |
| 3 | Free to use and transfer data | Small fee is charged to transfer data that is passed to the miners |
| 4 | No financial incentives | Crypto currency HNT is used to reward miners for transmitting data |
| 5 | TTN Coverage map | Helium Coverage map |
How to build on the Helium network?
If you would like to build on the Helium network start out by reading their documentation and join their Discord server. Their quick start guide covers registering an account on Helium console and how to add a device to Helium Console. So you can use the Helium Console to register, authenticate, and manage your device on the Helium network. Moreover explore how community members are utilizing the network in new ways.
Helium miners and proof of coverage
The Helium network using a system called Proof-of-Coverage. This system verifies hotspot devices are honestly representing their location and the wireless coverage they create. This coverage verification is important because hotspots must be in different geographical locations to ensure a consistent and stable network.
Do your own research before buying a miner
Perform your due diligence before you buy a miner. Below are a few items to consider.
- Determine if there are any hotspot miners in your area by searching Helium Explorer
- If there are other hotspots in your hexagon area your rewards will be lower
- Take note to the antenna’s hotspots in your area are using
- Which hotspots in your area are earning higher rewards?
- What is the cost of a hotspot?
- Where will you position the hotspot?
- Will you need to buy a new antenna?
What types of Helium hotspots are available?
One cannot build their own Helium hotspot miner. The only way to mine the Helium token is to buy a hotspot from an authorized vendor. Listed below are a few options to research:
In the RAK V2 box
For this tutorial we purchased a Rak V2 hotspot miner. You get the Rak V2 miner, antenna and a power cord. The Rak V2 package contains everything you need to setup a hotspot miner. Online other users have upgraded their antenna but we recommend you try the standard antenna for a week or two to determine its usability and your earning rewards.
Application and hotspot miner setup
In order to use the Helium miner you will need to download the Helium application on your phone. At the time of this writing we are not aware of a desktop application to manage the miner. Follow the steps below to setup your hotspot miner.
- First download the Helium application from the application store on your phone
- Then create a new account and generate a 12 word seed phrase
- Write down your 12 word seed phrase. Scroll through each word in the application
- Now confirm that you have written down your seed phrase correctly by choosing the words based on the numbers that are on the screen
- Then set a 6 digit pin for the application
- Now add a helium hotspot miner to the application. There are two types of miners on the Helium network. There are hotspots and validators. In our case we purchased a Rak V2 which is a hotspot miner.
- After that read the tutorial in the application
- Power on your Rak V2 hotspot miner and connect it to your router
- Press the pairing button on your hotspot miner then in the application press scan for a hotspot to pair
- Select your Wi-Fi network in the application to pair your miner
- Finally, after the device is setup it will be linked to the wallet in the application
Buying a used miner
There is a large secondary market for hotspot miners. Sellers need to transfer ownership of Helium hotspots to the buyers wallet address. This will allow new owners to receive mining rewards and enable configuration to change coverage locations.
How to transfer a used Helium hotspot miner
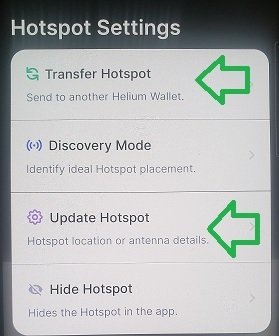
If you buy a used miner you will need to have the previous owner transfer the hotspot to your wallet. After the hotspot is transferred to your wallet it can be viewed in the phone application. Then you can start earning HNT rewards. Keep in mind there is a fee to transfer the hotspot to a different wallet. The fee to transfer a hotspot is approximately ~55,000 DC.
How to set a new location for a used Helium hotspot miner
If you update the location of your hotspot there is a reasserting location fee. The fee to change the location of your hotspot is approximately ~1,055,000 DC.
Where to place your helium hotspot miner
In order to determine the best location to setup your miner you will need to experiment and be patient. Put your miner in a location with unobstructed views at the highest elevation possible. Evidently the location of your hotspot has the biggest impact on your earnings potential.
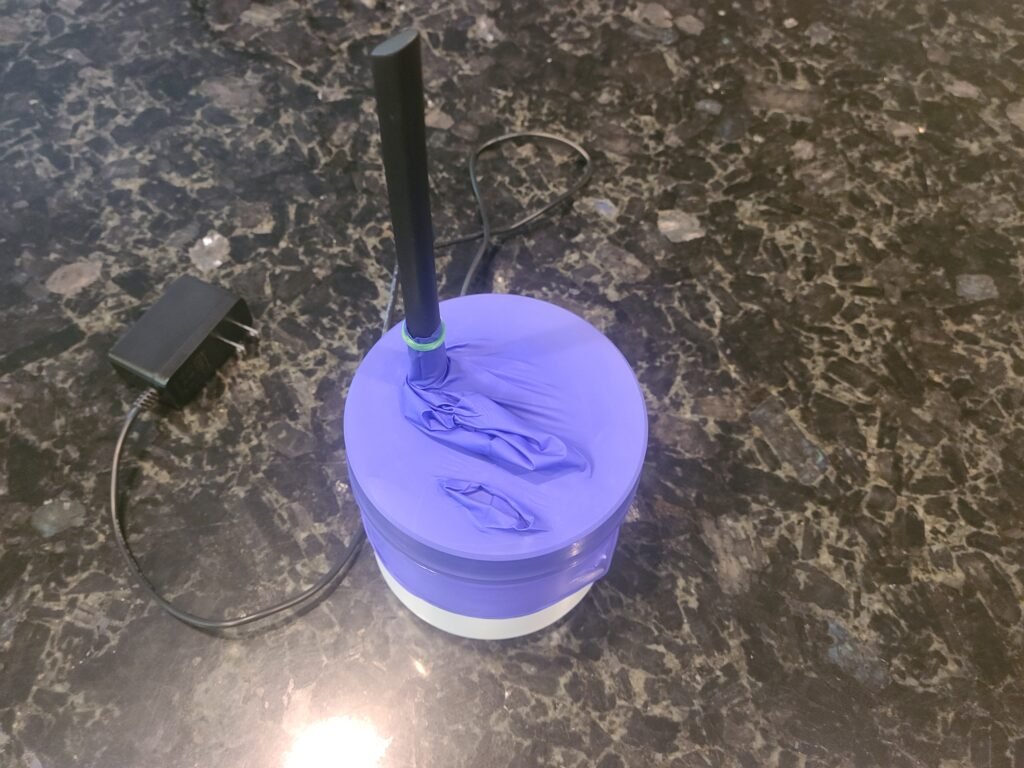
First I had the miner inside on the window sill for a week and analyzed the HNT earnings. Then I moved the hotspot outdoors in a home made container (see picture below) to determine if HNT earnings improved. Finally I put the miner in the attic and conducted additional analysis on earnings.
We earned the most HNT rewards with the miner high in elevation with unobstructed views of the sky. Keep in mind that windows, walls, trees interfere with radio waves and lower your earnings.
What antenna should you use for a hotspot
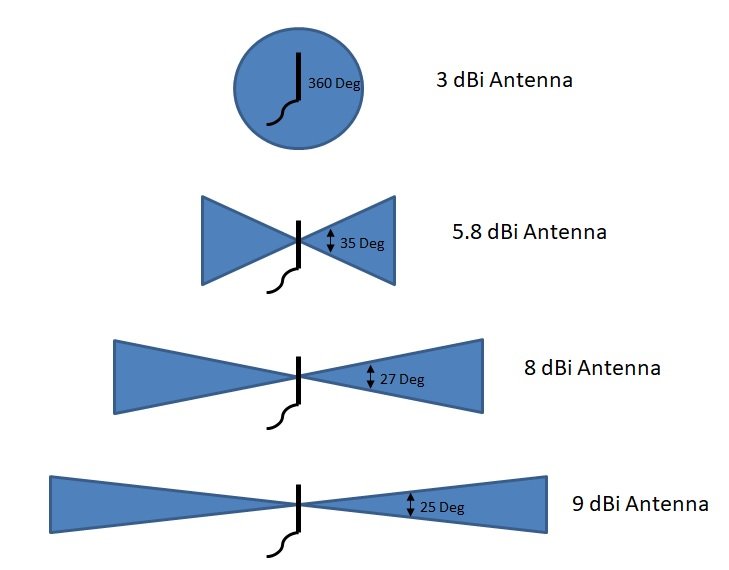
Antenna signals are measured in dBi (decibels-isotropic). An increase in dBi is not an amplification of the signal but a redistribution of radio frequency signals into a preferred direction.
A 3 dBi antenna is similar to most helium miner’s stock antenna. Use the 3 dBi antenna to determine if there are any hotspots within its radius.
An external 5.8 dBi antenna has a pattern of around 35 deg and may not detect hotspots that are lower in elevation. After trying the stock antenna try a 5.8 dBi antenna to see if you connect to any miners located longer distances out.
A 8 dBi antenna is designed to send a signal longer distances with little interference (for instance buildings, trees, mountains, etc). Since the redistribution of the radio frequency is concentrated to a smaller degree one might not connect to closer hotspots at a higher or lower elevation.
Use Helium Explorer to search for hotspots in your area and take note of their antenna’s dBi. In conclusion consider the following antenna setup:
- In the city try a 3 dBi antenna
- In the suburbs try a 3 dBi and or a 5.8 dBi antenna
- In a rural area try a 5.8, 8, and or 9 dBi antenna
Replace the SD in your RAK or MNTD miner
You may need to replace or rewrite the microSD card that comes with your hotspot if it:
- Shows “Disk Error” in the diagnostics
- Is not booting up (cannot connect over Bluetooth anymore after pressing the pairing button)
- Shows a solid or flashing green status LED
- Shows a very old block height and/or firmware version in diagnostics
- Power cycling has resulted in unknown micro SD card errors, such as corrupted files.
- If it’s stuck in the same block after 2 diagnostics were done 24 hours apart
Follow the instructions on the getmntd website to replace the SD card.
This procedure should only be used for MNTD, Rak V1.5 and Rak V2 (shipped in 2021 onwards). RAK V1 hotspots (units shipped in 2020) have their identity stored on the SD card which must be restored from your backup.
Finally, make sure you do your own research.


