In this tutorial we will capture an Ether balance in MicroPython on an ESP32 board. We will write Python code that will request a real time Ether balance from the Ethereum blockchain. Then, if the crypto currency balance in the Ethereum account changes the ESP32 Arduino board light will blink. This is a simple example of how blockchain and IOT (internet of things) can work together.
If this is your first time developing on an ESP32 microcontroller I recommend that you start by reading the getting started tutorial. This introduction will explain what software to download, flashing the ESP32 board, and writing a simple program in Thonny.
ESP32 microcontroller development board
We will be using an ESP32 microcontroller development board for this project. The Arduino board has a dual core 32-bit microprocessor, internal memory and supports Wi-Fi / blue tooth. The predecessor of the ESP32 is the ESP8266.
For more detailed specifications for the ESP32 board visit Espressif or esp32.net. To buy a ESP32 board use one of the links below.
Amazon – ESP32 microcontroller or ESP32 microcontroller with led
Blockchain API needed for the microcontroller board
The program that we will create and deploy on the ESP32 board will perform the following functions.
- Connect to the internet using Wi-Fi
- Request an account balance from the Ethereum blockchain
- If the Ether balance increases the light will blink on the ESP32 development board
To retrieve Ethereum blockchain information I tried to download Web3.py multiple times however I was not successful. The supporting libraries are to large to fit on the ESP32 board and and I ran into multiple errors during the download process.
So, for this project we will use Etherscan’s API. This API supports both GET/POST requests and has a rate limit of 5 calls per sec/IP. Etherscan makes it very easy to get data from the Ethereum blockchain. The Etherscan API supports many different functions and some are noted below:
- Accounts – balances, internal transactions, token information
- Contracts – ABI and source code
- Transactions – execution status and transaction receipt status
- Block information – rewards and block information
- Logs – log information
- and more.
Visit the developer API section of their website to learn more about the information that they provide. The samples are straight forward and most only require a change to the account and API key.
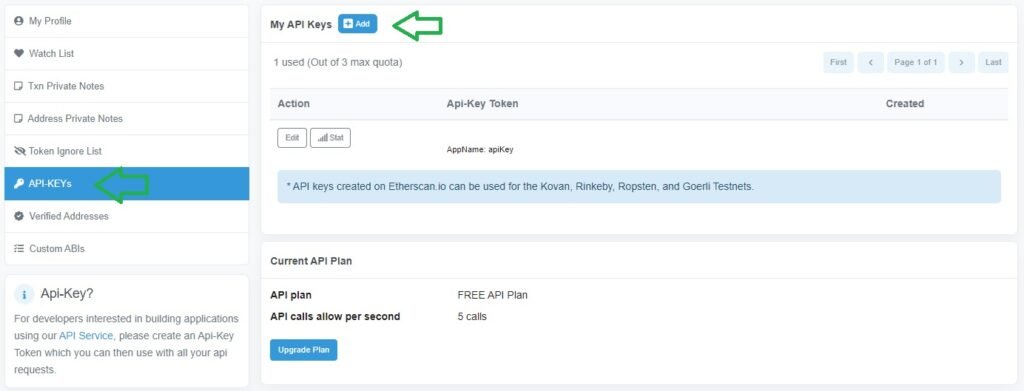
Create an Etherscan API Key
To use the Etherscan API you need a key for all GET/POST requests. To get an API key visit the Etherscan website and create a free account. Then from the account menu select API-Keys. After you request an API key it will be available to use almost immediately. Keep in mind that your API key can be used on the Kovan, Rinkeby, Ropsten, and Goerli Testnets.
HTTP GET requests
To make a GET request to Etherscan import the urequests module in the Thonny IDE. This module contains all the request functions we need for sending network requests.
import urequestsProgram in MicroPython to monitor Ether account balances on the Ethereum blockchain
For this project we will monitor the Ether account balance in the WETH smart contract. This contract has a lot of activity so it will allow testing our code to be quick and efficient.
To begin read the comments in the code below to understand how the process works. Then copy and paste each line of code in the shell section of the Thonny IDE. You will need to input you WI-FI ID, WI-FI password, and Etherscan API key to execute all of the code. Stepping through the process will be helpful to trouble shoot any potential problems. Finally, copy and paste the code into the main.py file on your ESP32 microcontroller board and run the process.
The code is very similar to the previous microcontroller tutorial where we fetched the real time BTC price from Coinbase. The patters of both projects are the same and each require very little code. The Etherscan API get request makes the code very simple. There is no coding overhead to start using their API to obtain Ethereum blockchain data.
The complete code for this project is listed below.
import network
import urequests
from time import sleep
from machine import Pin

#create a variable called led
led = Pin(2, Pin.OUT)

#create a variable called starting balance
startbalance = float(0)

station = network.WLAN(network.STA_IF)
station.active(True)

station.disconnect()
station.connect("YOUSSID", "YOURPASSWORD")

#prints true if connected
station.isconnected()

#returns the IP address, subnet mask, gateway and DNS as output parameters
station.ifconfig()


while True:
   #get account balance of ETH from the WETH contract
    response = urequests.get('https://api.etherscan.io/api?module=account&action=balance&address=0xC02aaA39b223FE8D0A0e5C4F27eAD9083C756Cc2&tag=latest&apikey=YOURAPIKEY')

    #print the response
    print(response.text)

    #parse the response
    parsed = response.json()

    value = float(parsed["result"])
    newbalance = value / 10**18

    print('strbalance', startbalance)
    print('newbalance', newbalance)

    #if the crypto currency price is > value blink light
    if startbalance == float(0):
        startbalance = newbalance
    elif startbalance < newbalance:
        led.on()
        sleep(1)
        led.off()
        sleep(1)
        startbalance = newbalance
    else:
        startbalance = newbalance
        sleep(5)
As seen in the video below the blue light on the board turns on when the Ether balance increases.
Blinking a light on a microcontroller is a simple development task. Now think about the potential IOT (internet of things) use cases that can be solved when combining smart contracts and hardware. The list of possibilities is endless.
- Buying a product from a vending machine
- Renting a storage unit or locker
- Paying a meter to park your car
- the list is endless
Next – Crypto currency mining, nodes and hardware

2 thoughts on “Ether balance in MicroPython on an ESP32 board”