In this tutorial we will create and deploy an NFT collection. First we will create a collection of images and upload them to IPFS (Inter Planetary File System). Then we will create a Solidity smart contract and link it to the images. Finally we will test the NFT’s on Open Sea. If you are not sure what an NFT is you can read more about them here (Non Fungible Token).
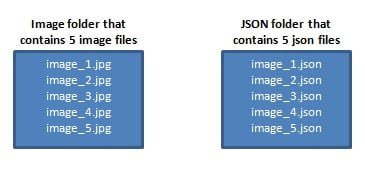
Images and JSON files for NFT collection
To make and deploy an NFT collection we need to make sure our project structure is setup correctly for scale. If you want to create 5 NFT’s or 5,000 NFT’s the structure of the data and folders will be the same. You will need to create an image folder and a JSON folder. Each folder will contain files needed for this project. Take the time to organize your files and save them in a location on your computer for easy access.
Create a image folder for NFT’s
You will need to create a folder that contains all of the images you would like to make into NFT’s. You can use any set of images to create NFT’s. Create a folder called “images” and put all of your pictures in this folder. For this tutorial name each of the image files with the name image_number and use the .jpg extension.
Create a JSON folder for NFT’s
Then create another folder called “JSON”. This folder will contain the corresponding JSON files for each picture. The JSON files are used to give your NFT’s traits. To create the JSON files use your favorite text editor. I used PyCharm to create these files and saved each file in the JSON folder. The JSON structure that I used for each file is below. Make sure each JSON file corresponds to an image name (as an example – image_1.jpg). Add, remove and change attributes to correspond to your images and project. Note that we will update the {CID} later in the process.
sample JSON file
{
"name" : "Image name",
"description" : "Description of image",
"image" : "https://ipfs.io/ipfs/{CID}/image_1.jpg",
"attributes" : [
{
"trait_type": "Strength",
"value": 75
}, {
"trait_type": "Eye color",
"value": "Blue"
}
]
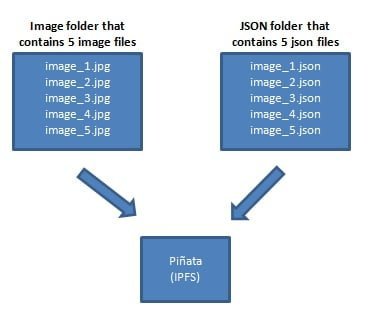
}Upload images and JSON files to Pinata
Next create an account on Pinata. They provide a service to upload files to IPFS and you can sign up for a free account. With their free account you can experiment and quickly get your NFT project up and running. Remember IPFS is a public network so only post information that you want to share with the world.
After your account is created on Pinata perform the following steps:
- Upload the folder that contains all of your images
- After the folder is uploaded in Pinata a CID is created
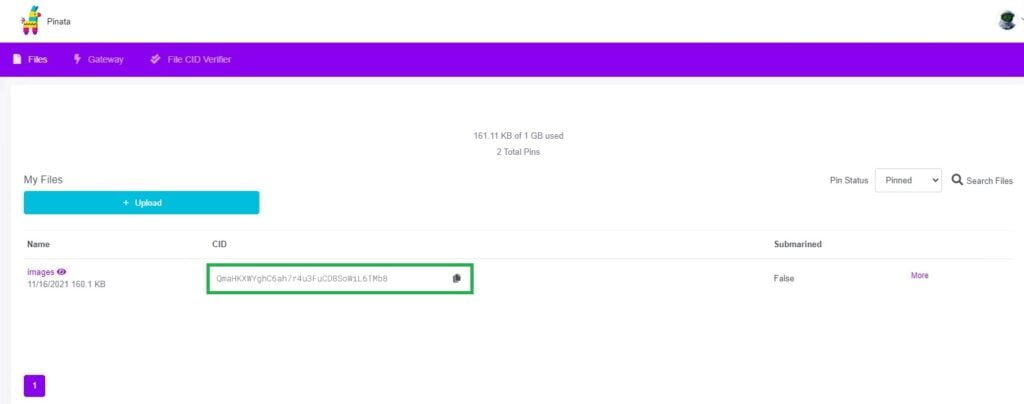
3. Copy this CID and paste it into each of your JSON files (see example below)
{
"name" : "Image name",
"description" : "Description of image",
//paste the CID in the url below in all JSON files
"image" : "https://ipfs.io/ipfs/QmaHKXWYghC6ah7r4u3FuCD8/image_1.jpg",
"attributes" : [
{
"trait_type": "Strength",
"value": 75
}, {
"trait_type": "Eye color",
"value": "Blue"
}
]
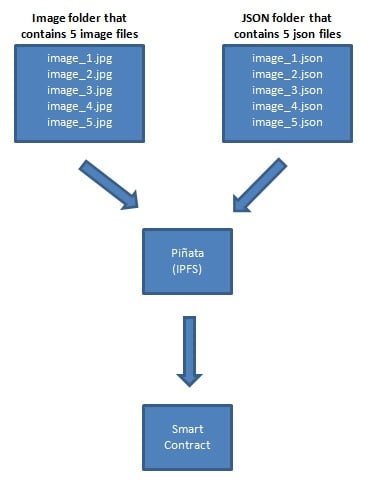
}4. After all JSON files have been updated with the CID in the URL upload the JSON folder to Pinata. After you upload the JSON files in Pinata a new CID will be generated for the JSON folder. The JSON folder CID will be used in your Solidity smart contract.

Create and deploy a Solidity ERC721 smart contract for your NFT collection
Now lets create an ERC721 Solidity smart contract for our NFT collection. This smart contract will allow you to mint an NFT and will keep track of all tokens and owners. It is important to note that this contract uses the IPFS location of the JSON folder.
The ERC721 smart contract below imports Open Zeppelin’s ERC721 and Strings contracts. Two functions were added to the contract below (Mint and TokenURI). This is a sample contract and can be extended to meet your projects goals.
Read the comments in the code to understand how the smart contract works.
pragma solidity ^0.8.2;

//import Open Zepplin contracts
import "https://github.com/OpenZeppelin/openzeppelin-contracts/blob/master/contracts/token/ERC721/ERC721.sol";
import "https://github.com/OpenZeppelin/openzeppelin-contracts/blob/master/contracts/utils/Strings.sol";

contract NFT is ERC721 {
    uint256 private _tokenIds;

    constructor() ERC721("Name", "Symbol") {}

//use the mint function to create an NFT
    function mint()
    public
    returns (uint256)
    {
        _tokenIds += 1;
        _mint(msg.sender, _tokenIds);
        return _tokenIds;
    }

//in the function below include the CID of the JSON folder on IPFS
    function tokenURI(uint256 _tokenId) override public pure returns(string memory) {
        return string(
            abi.encodePacked(
                "https://ipfs.io/ipfs/xxxxxxxxxxxxxxxxxxxxxxxxxxxxxxxxx/",
                Strings.toString(_tokenId),
                ".json"
            )
        );
    }
}
Try it in Remix
In the future add a minting fee to your contract. For the purposes of this demonstration we are leaving it out. This makes the contract and process easier to understand and test.
    //add a state variable
    uint256 public mintingFee = 20000000000000000;

    //add a function to change the state variable
    function setMintingFee(uint256 _fee) public onlyOwner {
        mintingFee = _fee;

    //add a require statement to the mint function
    require(mintingFee <= msg.value, "Not Enough Ether To Mint");
Deploy the contract on the Goerli network and test your NFT’s on Open Sea
Use Remix to upload your contract to the Goreli next work. After you upload the smart contract mint an NFT directly in Remix.
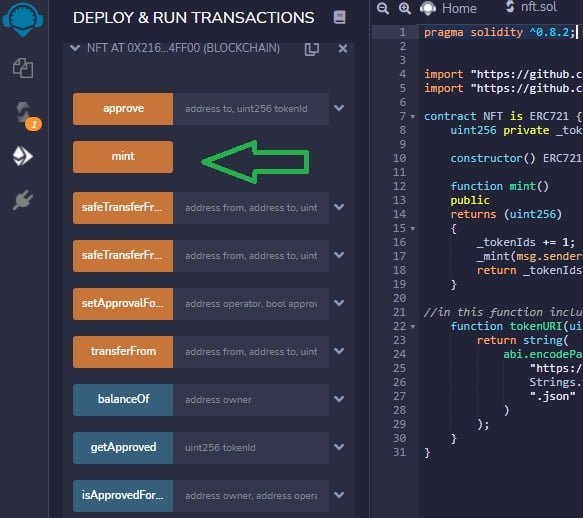
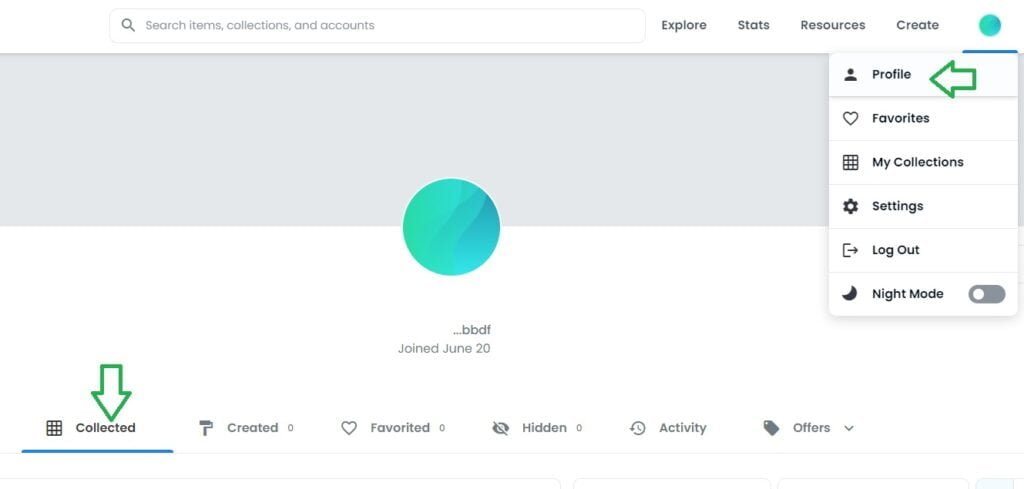
After you create and deploy an NFT collection test out your NFT’s on Open Sea. Finally go to the Open Sea test environment at https://testnets.opensea.io/ and connect your wallet that contains your newly minted NFT’s. You will be able to see the collection of NFT’s that you own in your wallet on the Open Sea platform. Select Profile then Collected.
Resources
Blockchain Networks
Below is a list of EVM compatible Mainnet and Testnet blockchain networks. Each link contains network configuration, links to multiple faucets for test ETH and tokens, bridge details, and technical resources for each blockchain. Basically everything you need to test and deploy smart contracts or decentralized applications on each chain. For a list of popular Ethereum forums and chat applications click here.
| Ethereum test network configuration and test ETH faucet information | |
| Optimistic Ethereum Mainnet and Testnet configuration, bridge details, etc. | |
| Polygon network Mainnet and Testnet configuration, faucets for test MATIC tokens, bridge details, etc. | |
| Binance Smart Chain Mainnet and Testnet configuration, faucets for test BNB tokens, bridge details, etc. | |
| Fanton networt Mainnet and Testnet configuration, faucets for test FTM tokens, bridge details, etc. | |
| Kucoin Chain Mainnet and Testnet configuration, faucets for test KCS tokens, bridge details, etc. |
Web3 Software Libraries
You can use the following libraries to interact with an EVM compatible blockchain.
- Python: Web3.py Python library for interacting with Ethereum. Web3.py examples
- Js: web3.js Ethereum JavaScript API
- Java: web3j Web3 Java Ethereum Ðapp API
- PHP: web3.php A php interface for interacting with the Ethereum blockchain and ecosystem.
Nodes
Learn how to run a Geth node. Read getting started with Geth to run an Ethereum node.
Fix a transaction
How to fix a pending transaction stuck on Ethereum or EVM compatible chain
Next Review – Implement Upkeep using Chainlink Keepers
